The question pool or assessment asset is used to create and manage test questions. Every time you add a question pool asset, you create a group or sets of test items, which you can categorize based on a specific mastery or goal.

Adding a question pool also simplifies the assessment management process because its features let you intuitively copy and reuse question templates and categories.
Assessment Settings
The Assessment settings page consists of several tabs you can turn on and off, each having different functionalities to help you configure your assessment questions.

Main tab
You start creating test items for your assessment in the main tab. The first thing you need to do when on the page is to select the assessment type you want for your users. An assessment type can be:
- Student-paced – users take on the test items at their own pace.
- Instructor-paced – the instructor administers the assessment.
- Interactive Video – assessment questions are answered using an interactive video you map out from YouTube or Vimeo.
Under Questions, you have two primary buttons:
- Add question – click this to create and select a question type
- Add pool – click this to create a collection of questions of a specific category
To learn how to use these functionalities, refer to the following articles:
- Add an Assessment asset using the Control Panel
- How to Add a Pool to the Assessment Asset
- Manage Pools: Add Questions and Categories
Options tab
After adding questions and categories, there are instances you might need to configure how your questions will appear on the user’s side. This scenario might involve setting navigation controls or creating message prompts for your users before or after answering questions.
In the Options tab, you have functionalities to help you choose what labels, pages, and navigation controls to show or hide for your users. The functionalities are:.
Header – you have four options to choose from when setting your assessment header:
- Assessment title – the header will include the main assessment title
- Assessment title + question title – the header will consist of the assessment title, including the question
- Question title – the question will show as the header
- None – No header will be shown
Questions per page – enter a value to set the number of questions per page. 
Navigation - To set navigation instructions, go to Navigation and select one from the following dropdown options:
Numbers + Submit

Dropdown + Submit

X of Y + Submit

Prev. + X of Y + Next

Prev. + Numbers + Next

Percentage

Submit only

Mastery score – the score users need to achieve to pass the test.
Start Page – enabling this button will show an extra tab on the assessment settings. Once enabled, enter the text you want users to see as an introduction to the test. For example, you can inform users of the duration and whether a time limit is assigned to the test.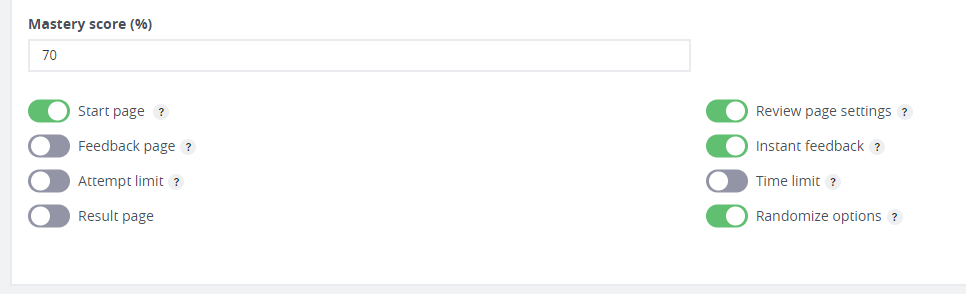
Review Page – enabling this button will show an extra tab where you’ll set the details to appear when users need to review their test results.
Feedback Page – turning this button on will show a new tab where you’ll enter the text you want to display when users pass or fail the test. If you prefer to include their score, use the format Score:
- $$Assessment Name
- $$Mastery Score
- $$NumberofQuestion
Instant Feedback – turn this on if you want to inform users of their correct answers.
Attempt Limit – enable this button if you want to limit the number of attempts users can answer a question.
- Time Limit – enable this button if you want to set a time limit on a test.
- Randomize options – enabling this button will randomize question options.
Labels
Default labels as set on the Assessment settings page. You, however, can change these labels according to your preferences.
Review pages settings
For your users to get a complete overview of their test results, there are a few buttons you need to enable on the Review page settings.
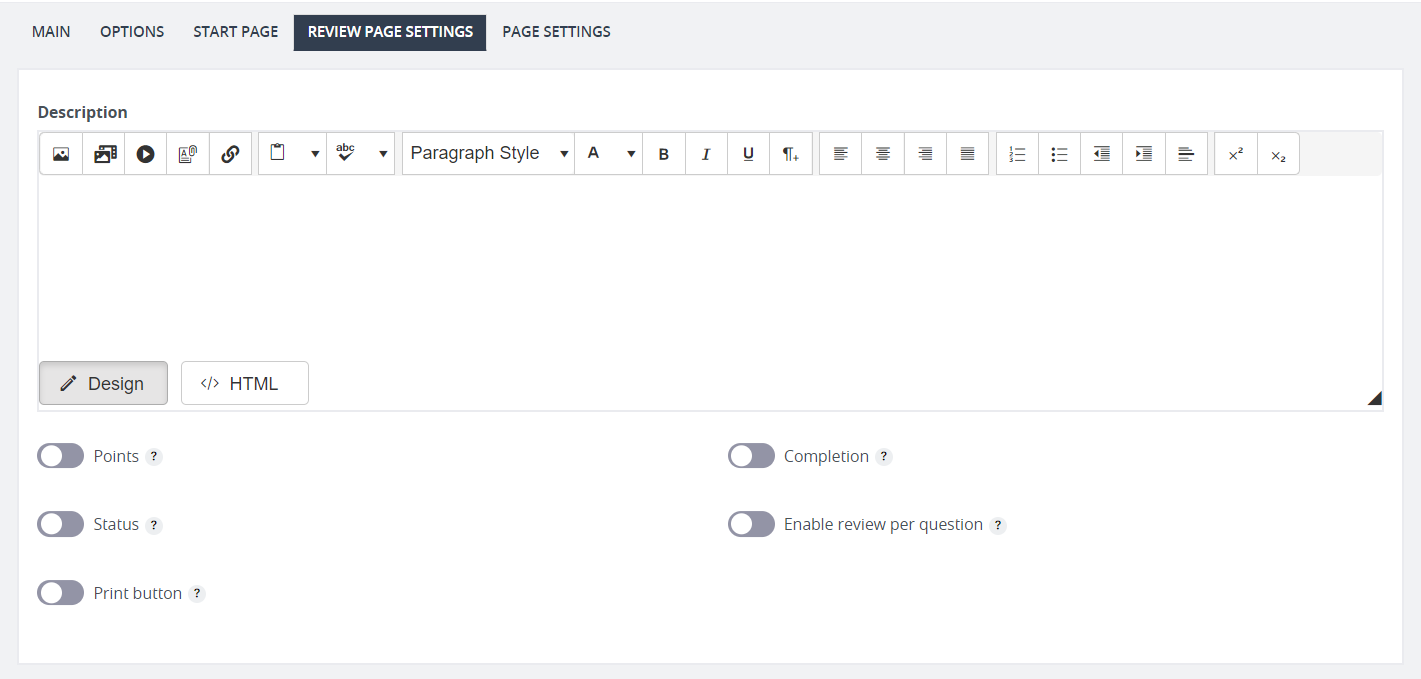
- Points- the points garnered for questions with correct answers
- Status – enable this button to inform users whether they got correct or incorrect answers. It will also show if the user did not attempt to answer a question.
- Print button – allows user to print their test results
- Completion – enabling this button with show the completion status of every question
- Enable review per question – enable this button to allow users to click and review correct/incorrect answers per answered question
- Description – use this box to enter a text description for the review page
Note: The page settings page in the Assessment asset has the same functionalities as the page settings in the Control Panel.